This is a new section where unique information is presented to help maintain your rimfire rifle for optimal performance, as well as some suggestions on tuning. This will be an evolving section with continual updates.
Current List of Topics
Current List of Topics
- Magazine Loading
- 64 Action Bolt Lubrication
- 54 Action Bolt Lubrication ( new )
- Trigger Adjustments
- Action Screw Torque
- 1727 / 1827 Bolt Assembly
- Wood Stock Care
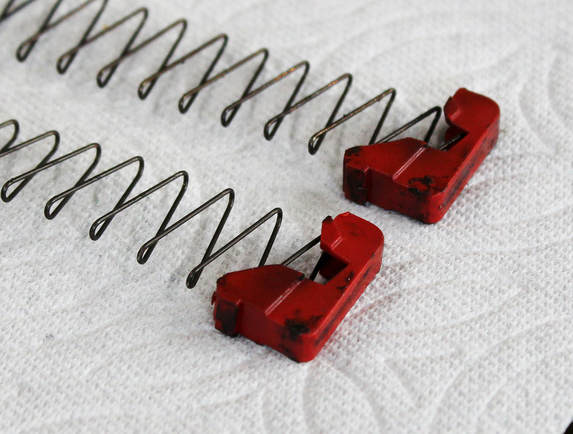 Clean Me..!
Magazines
Many times we see shooters struggling with feeding issues, and in almost all situations the problem is rooted in two simple things:
- Dirty magazine
- Improperly loaded magazine
Luckily, with a little effort and maintenance, these issues can be easily managed.
Of the two issues, historically improper magazine loading is the most common culprit. Interestingly, we have now see a surge in shooters struggling with dirty magazines and feeding issues. Maybe people are shooting more, or that they are shooting in more challenging conditions out in the field and in dusty conditions.
That said, the following information will break this down and resolve a few problems.
 Correct Loading Placement
Magazine Loading - Part 1
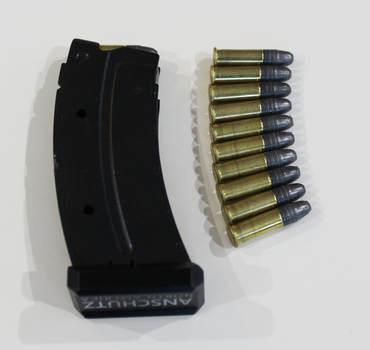
Rimfire ammunition has a unique aspect to case design and that is the large brass rim at the base of the cartridge. While this design feature holds the priming material and allows for the ignition of the powder, it makes loading the cartridges into a linear magazine somewhat tricky.
Most magazine feeding problems are caused by a misalignment of the cartridge's rims inside the magazine. This can easily happen when loading the magazine and pushing down the cartridge to make room for loading the following cartridge.
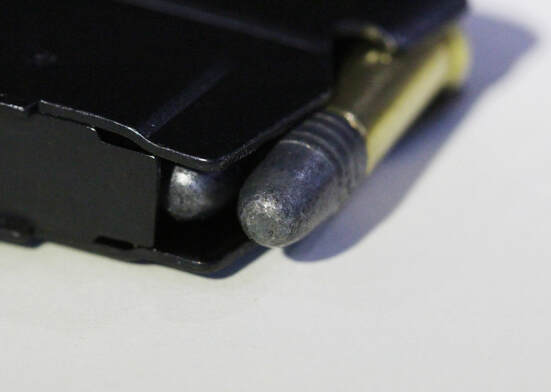
With this first image, you can see the rims stacked correctly. Each case rim needs to be in front of the rim from the cartridge below. This way the cartridge can feed smoothly from the magazine and into the chamber.
This also helps reduce the curve of the ammunition when stacked in the magazine body.
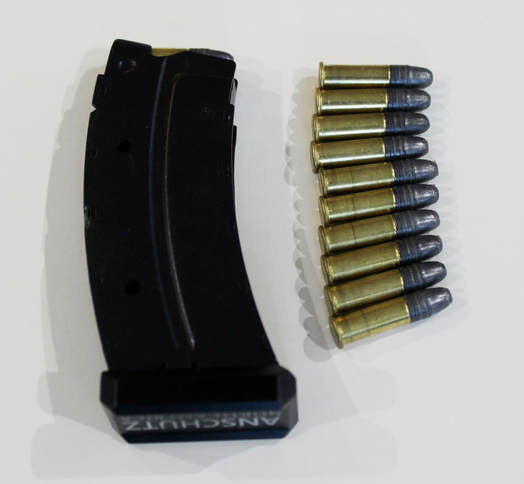 Loading Error with the 4th Round
Magazine Loading - Part 2
When the rounds are loaded into the magazine with excessive force, it is possible to push the top cartridge's rim over the rim of the case below in the magazine. This is accompanied by an audible "click."
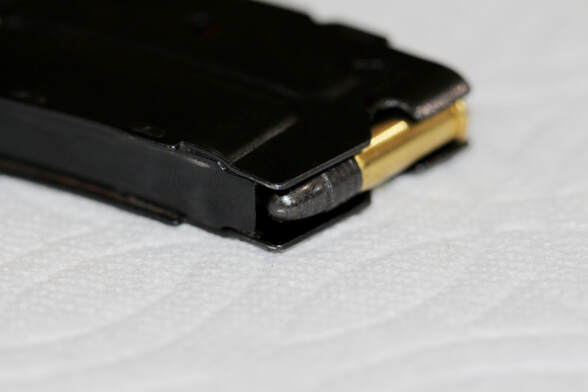
Usually the first thing you will notice is that once the magazine is loaded, the nose of the top round will be sitting low in the magazine. When trying to shoot, the rounds in magazine will give the shooter jamming issues and not feed smoothly into the chamber. Usually the shooter plucks the jammed round out of the chamber, or in extreme circumstances the rifle completely locks up and requires the removal of the magazine and clearing the jammed round.
The frustrating part for many shooters is that the problem seems random, and they will try different ammunition types thinking that the problem is the bullet nose dragging in the magazine body. This not the case.
It is important to carefully load the magazine and avoid overlapping the case rims. After a few times of loading the magazine correctly, you will get a feel for how the rounds stack in the magazine body and your feeding problems will go away.
We have also noticed that this tends to happen during the last few rounds when loading the magazine, when spring pressure is increased. If the spring is giving you issues, you might want to consider one of our enhanced aluminum magazine bases. These offer extra space and help guide the spring to ease loading and improve feeding performance. They also look quite sharp.!
|
Correctly Loaded
This photo above shows the correct position of the loaded rounds in the magazine. Each rim is in front of the rim below, resulting in the correct feeding angle and smooth cycling. If the front of your magazine does not look like this, chances are you have an overlap of case rims somewhere in the magazine. |
Incorrectly Loaded
Above is the position of the top loaded round when you have a case rim in the wrong position, forcing the top round to point low in the magazine. In this situation, you will have feeding issues until the incorrectly loaded round is reached. |
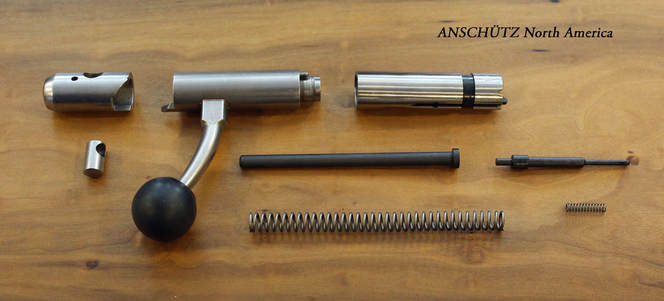
64 Action Bolt Lubrication
The 64 bolt has a few key points of lubrication which should be considered to ensure optimal performance.
In the section, three photos will identify the parts and lubrication points.
This image shows the major bolt components, and the two items of importance for this discussion are the large black striker rod and smaller black firing pin.
Both of these items need a light coating of oil at all times to operate properly. The firing pin only needs a very light coating due to minimal weight and contact points.
The striker rod is under much more spring tension and needs a high-quality oil to function correctly.
Note: In older rifles, these parts are polished steel and the same color as the bolt. Newer models have a black coating to prevent rust. It is not a lubricating coating, and like the older bolts, require proper lubrication.
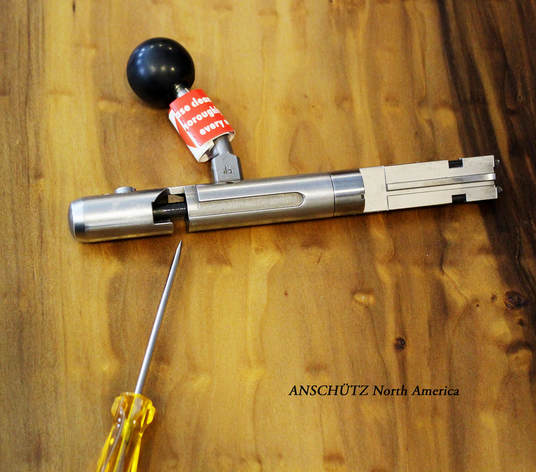
Oil Point
In Photo 2, you can see the small screw driver pointing at the black striker rod. When the bolt is cocked, apply a few drops of oil to the area where the striker rod passes into the bolt body.
Place a few drops of oil there as well as on the striker rod area which is exposed. You do not need to remove the striker rod and fully oil.
The main shaft of the rod does not contact the inside of the bolt body.
It is very important that a light coating of oil is present at all times in this area.
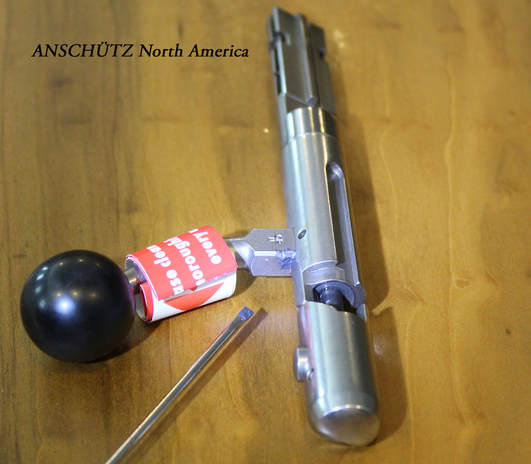
Bolt Grease
In this photo you will see a small amount of moly-grease applied to the bolt handle.
This handle also acts as the locking lug for the bolt. It is important to keep a small amount of high-quality grease in that area.
It will make the rifle function smoothly and protect the metal surfaces.
In this photo you will see a small amount of moly-grease applied to the bolt handle.
This handle also acts as the locking lug for the bolt. It is important to keep a small amount of high-quality grease in that area.
It will make the rifle function smoothly and protect the metal surfaces.
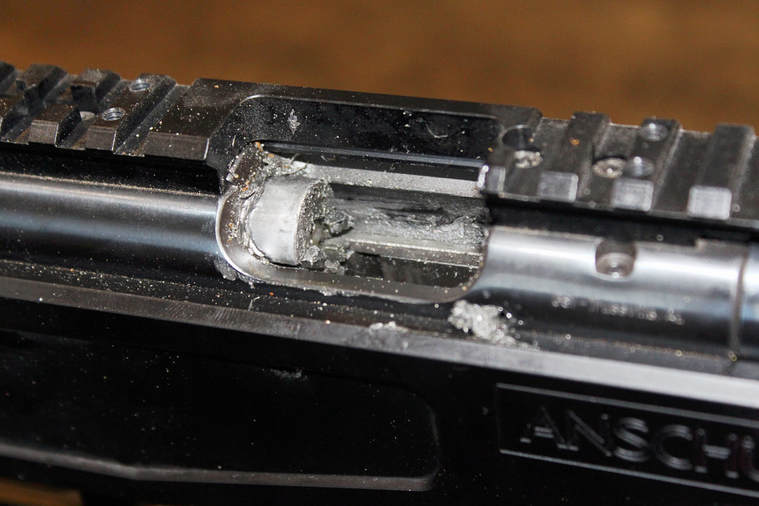
Match 54 Bolt Maintenance
Cleaning and maintaining your match 54 bolt is important for optimal performance. The following information will show you how to dissemble the bolt, identify all the parts, clean, and then properly reassemble.
When shooting your Anschütz match 54 action rifle, fouling tends to accumulate on the bolt face, shell holder, and extractor hook. Because of the very precise fit of the bolt to the receiver, very little fouling makes it back to the locking lugs or trigger groups.
This is an intentional design and gives reason as to why our rifles can still feel smooth and precise even after firing nearly 5,000 rounds in a single and very long testing session.
That said, carbon fouling, along with some bullet lubrication will eventually coat the entire bolt and start to make things feel a little tight when operating the bolt.
Unlike many other bolts, the match 54 bolt requires no tools for standard maintenance and service. The only cleaning tools you will need are a small brush, short .22 caliber nylon brush, and a soft cloth to wipe down the parts.
For cleaning chemicals, you only need a light oil and a high-quality grease.
This section covers models: 1710 / 1712 / 1907 / 1913 / 2007 / 2013 / 54.18 / 54.30
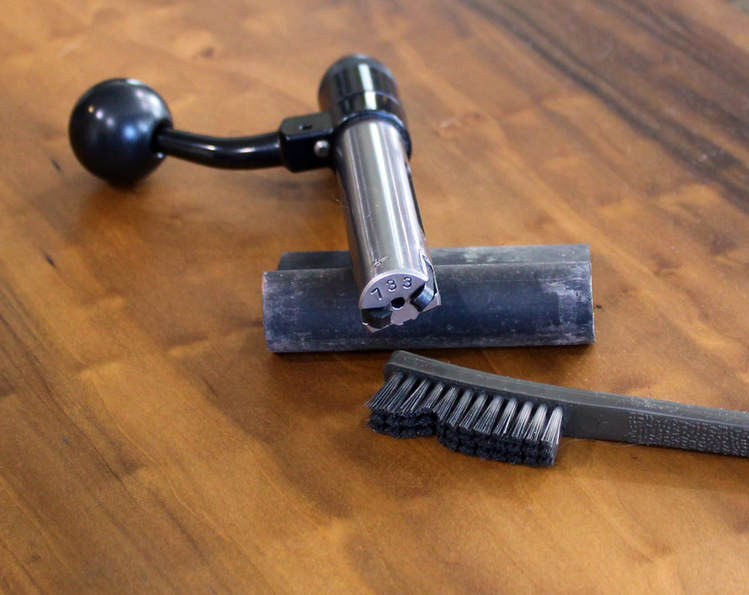
The first step to cleaning is wiping down the entire bolt with a soft cloth. If the carbon fouling is difficult to remove, a light-weight oil applied to the cleaning cloth will help remove the fouling. We high-polish the bolt bodies at the factory to allow the easy removal of fouling.
With the bolt body clean, take a brush and scrub out any fouling which has accumulated under the extractor hook and shell holder. This is the first and most common place for fouling to accumulate.
It’s also not a bad idea to clean out the machined slots on the side of the breech face on the barrel. Fouling becomes packed in these slots over time.
Once you have the bolt face clean, inspect the holder and extractor for any damage to the surface. We rarely see damage to these parts, but a small chip can cause problems with extraction and ejection.
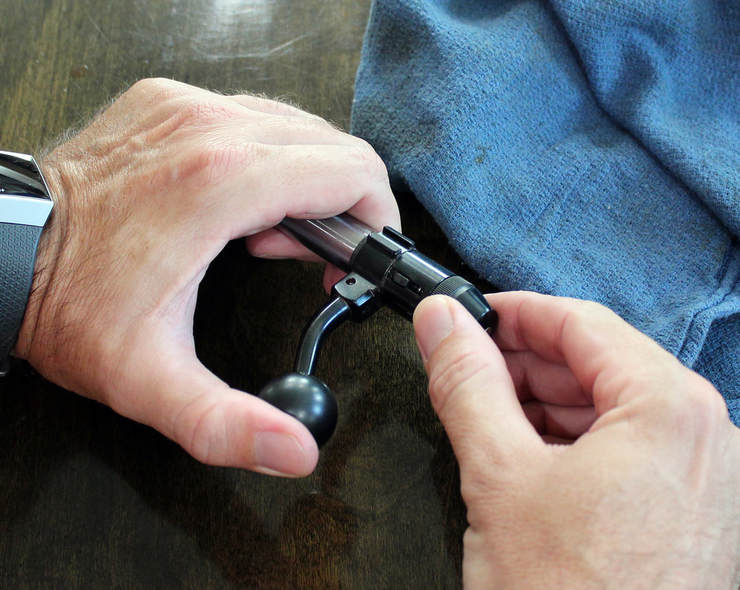
With the exterior of the bolt cleaned, it’s time to break it down. The first step is to uncock the bolt. Grasp the bolt body in your left hand, and with your right hand, rotate the bolt handle clockwise. You will hear a click from the firing pin moving forward.
Next, with the bolt body held in your left hand, unscrew the rear bolt cap counter-clockwise. If you are having a hard time unscrewing the cap, wrap a soft cloth around the cap for better grip. Do not use pliers! You will damage the blued finish of the cap. This operation requires no tools, so if it seems stuck, please reach out to our service center and we will get you squared away.
Once the cap is loose, completely unscrew the bolt cap and remove. From there you can remove the spring, cocking indicator, dust cover, firing pin, and bolt handle. Again, you should not need to use force for any of this operation.
If you are having a hard time, make sure the bolt is uncocked.!
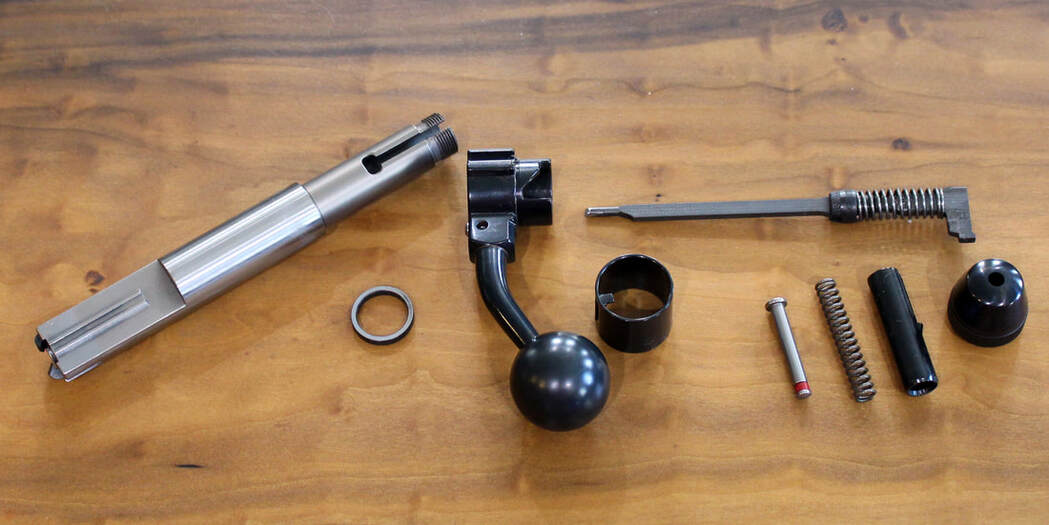
With the parts laid out, wipe each part down from any fouling. If the rifle is new, you will find a heavy grease coating the internals. This is to not only lubricate the parts but also prevent rust in humid climates.
You can remove this grease; we will be re-oiling and greasing the parts. You can also leave this grease in place if the rifle is new and unfired, and you are just taking the bolt apart to satisfy your personal curiosity! We know this happens frequently.
With the parts wiped down, it’s time to clean the inside of the bolt.
Please note in this photo, the steel distance ring is only found on the 54.30 bolt.
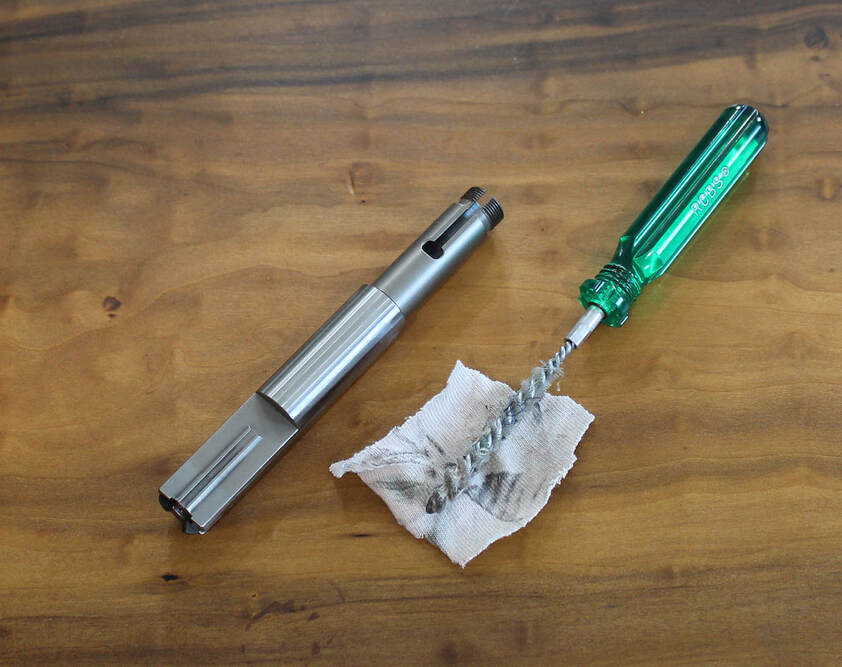
To clean the inside of the bolt, take a short nylon brush and small piece of cloth and wrap the brush. Take this and slide into the bolt body and give it a few rotations.
Do no try to jam it all the way down into the bolt; the bolt narrows near the bottom and has the extractor hook and shell holder bases protruding into that space.
From there, rotate the bolt and check to see if there is any fouling in the firing pin hole. If so, brush it away and use a small wooden toothpick to push any fouling out of the hole. If you do this, repeat cleaning the inside of the bolt body to remove this fouling.
With these parts now clean, it’s time to oil and grease the parts and reassemble.
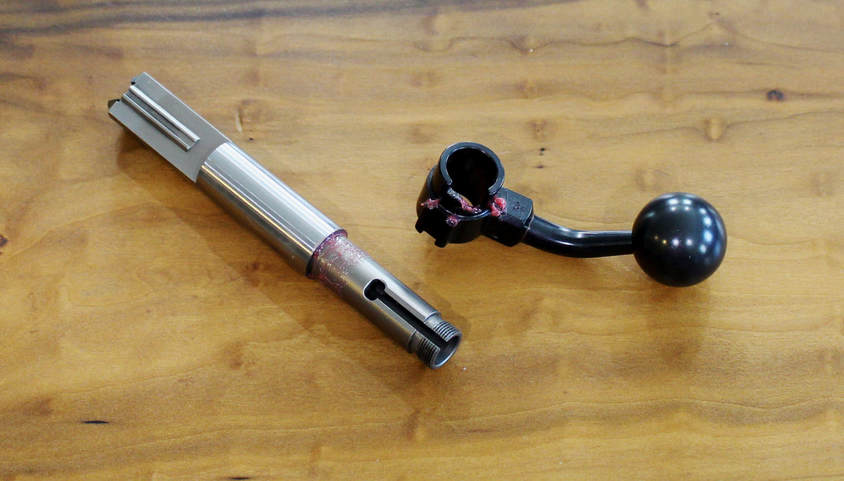
There are only two parts to the bolt which require grease; the bolt body and the bolt handle. In this photo you can see a light, pink grease applied to:
-- The bolt body where the bolt handle rotates
-- Bolt handle locking lugs
-- Bolt handle cocking ramp for the firing pin
Note: any high-quality firearms grease can be used.
These areas need grease because they operate under pressure when you open and close the bolt. There will be one more spot where we use grease, but that is at the very end when the bolt is finished.
With the grease on these parts, you can now start reassembly by placing the bolt handle onto the bolt body.
If you have a 54.30, place the steel distance ring onto the bolt body first, and then the bolt handle.
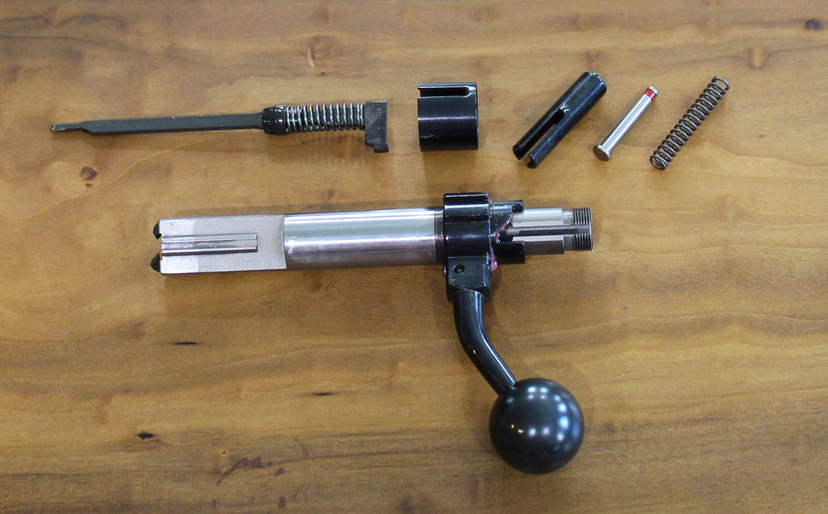
The next step is to make sure your firing pin spring is not twisted. Rotate the spring slightly to get any bow or flex out of the spring. It should move freely when inside the bolt. Check this before oiling the parts.
Once you have checked that, coat the entire firing pin with a very light oil. This will prevent rust and help the firing pin move freely. Do not use grease on the firing pin. This will slow down the firing pin travel and cause accuracy issues.
You can also place a very light coating of oil on the remaining parts to prevent rust, but do use a light coating of oil; nothing heavy.
In this photo, the parts are laid out in the correct assembly sequence. Again, no force is needed to rebuild the bolt.
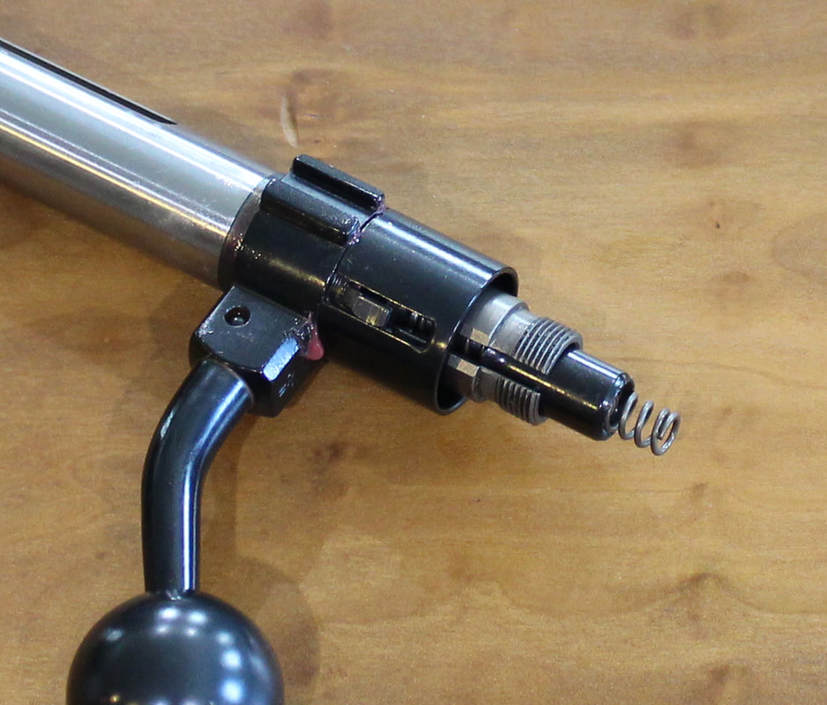
Here is the bolt correctly assembled, without the rear bolt cap installed. Do note that the bolt is uncocked, with the firing pin completely lowered. You must do this to install the bolt cap.
If you are having trouble with reassembly, make sure the metal guide tab on the bolt cap retention sleeve is correctly oriented. The “toothed” side of the sleeve should be towards the rear of the bolt. These teeth grab on to the inside of the bolt cap and prevent it from unscrewing.
As the last step, replace the bolt cap by screwing the cap on clockwise. Make sure you use even downward pressure when doing this, and smoothly engage the threads on the end of the bolt.
If this is difficult, stop and make sure that the bolt is reassembled correctly and the firing pin is not cocked. Smooth, even force is all that’s required to compress the spring and thread on the bolt cap.
Important..! The bolt cap only needs to be hand-tight. Do not crank down on the cap; this is unnecessary. On many bolts there will be a slight bit of play with the dust cover on the bolt. This does not need to be crushed into place. The cap will not unscrew during use, so only hand tight!
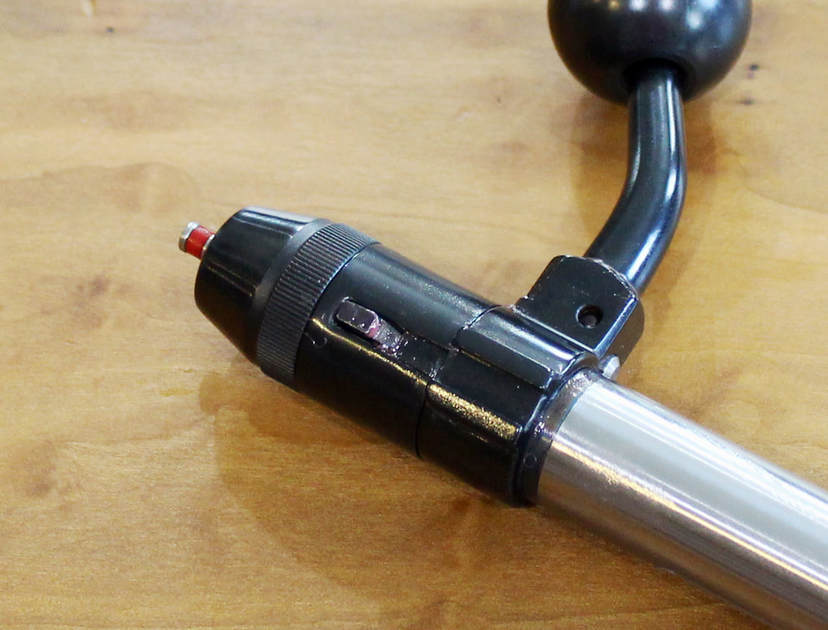
With the bolt assembled, you can use a light coating of oil on the bolt body to help it run smoothly in the action.
Before you replace the bolt into the action, place a very small spot of grease on the firing pin. This will help for an even release shot to shot.
If you have any further questions, please reach out to our service center for assistance.
Before you replace the bolt into the action, place a very small spot of grease on the firing pin. This will help for an even release shot to shot.
If you have any further questions, please reach out to our service center for assistance.
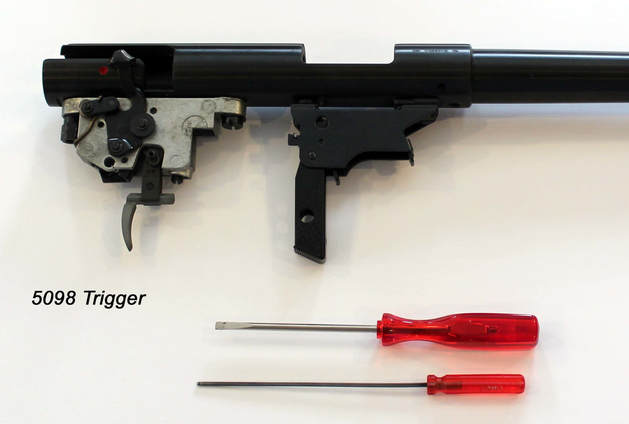
Trigger Adjustment
Covering models: ( 5098, 5094, 5109, 5110, 5096 )
The Sporter series of our rifles feature a few different trigger versions, but they all adjust the same way.
Here is a quick guide for adjusting your trigger. Please take great care when adjusting the trigger and follow the instructions closely.
Failure can result in an unsafe trigger and even damaging the trigger parts.
Under no circumstance should you "flush" the trigger out with any kind of solvent; this voids the warranty. If the trigger becomes dirty from dust, lint, or other fouling, please contact the Service center for assistance. The trigger is designed to operate with high-quality grease on the sear.
Before you make any adjustment, it is your responsibility to read over the owner's manual / CD provided with your rifle. They can also be downloaded from the main website in Germany.
During the process, there should not be any live ammunition loaded in the magazine or present on the workbench. Throughout this process, verify the rifle is not loaded. Safety is everyone's responsibility.
You will need one small flat-head screw driver and one small 1.5mm hex-keyed wrench for this operation.
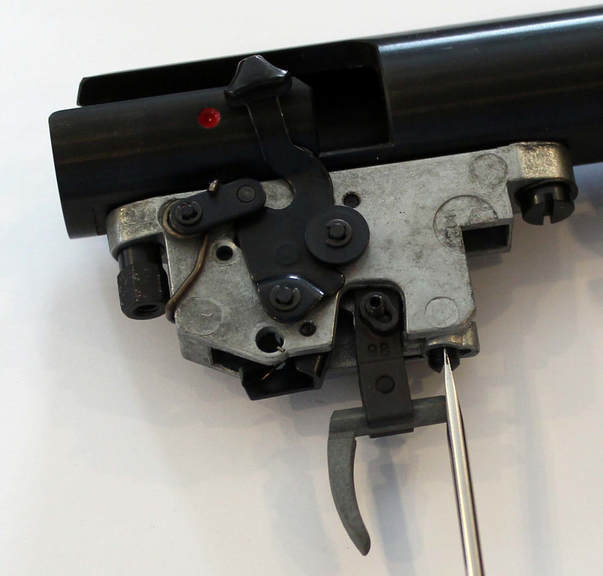
Trigger Weight Adjustment
Adjust the trigger weight with set screw ( small flat-head screw ) by turning it to the right (clockwise) to increase trigger weight.
If you turn this screw to the left, the weight is decreased.
Do not completely remove the screw when changing springs or making other modifications.
The aluminum housing is very easy to cross-thread when reinserting the screw. If you do remove this screw, pay close attention when reinstalling.
After this adjustment, test the safety's function and verify the rifle is operating properly.
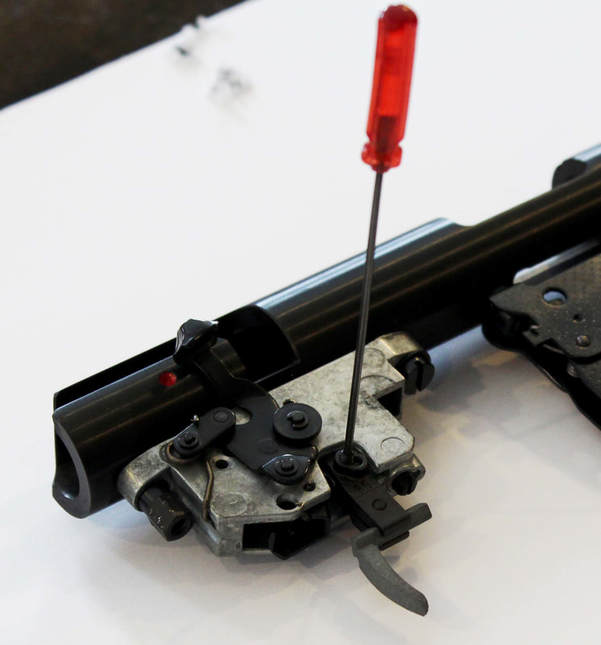
Sear Engagement
To Reduce Sear Engagement - Adjustment of the sear engagement for triggers with the set screw (1.5 mm set screw ).
-- Remove the bolt during adjustment.!
If you turn to the left (counter-clockwise), the sear engagement is shortened – meaning that the trigger will need to move less before the firing pin is released.
This is adjusted at the factory for an optimal and safe setting, thus adjustment is often unnecessary. Adjusting this further may cause the rifle to fire when bumped or dropped.!
To Increase Sear Engagement - Turn the screw (clockwise) and the sear engagement is increased. The result will be a longer trigger pull is required to release the firing pin.
This may also give the feeling of an increased trigger-pull weight.
Additional Information – Standard Setup
Make sure your rifle is not loaded. Cock the rifle and release the trigger. Check if the trigger releases as desired.
If the sear engagement feels too long, turn set screw No. 1 counter-clockwise after cocking and releasing (approximately 1/8 turn each).
Repeat this process until the rifle does not remain cocked, then 1/2 turn back to the right. Thus the sear engagement is adjusted to a standard specification.
After this adjustment, test the safety's function and verify the rifle is operating properly.
Action Screw Torque
We have received many questions about action screw torque for our sporting rifles.
After a series of tests at the factory, we have decided that the best approach is suggesting a range of torque values to work within.
While some rifles have shot well with less screw torque than what is listed, most performed their best within this range. Very few shot better above this range, and possible damage may occur.
We have just recently updated out manuals on line as well as on the new CD's which come with the rifle, but for those with older rifles, you can use this information listed here.
The new information:
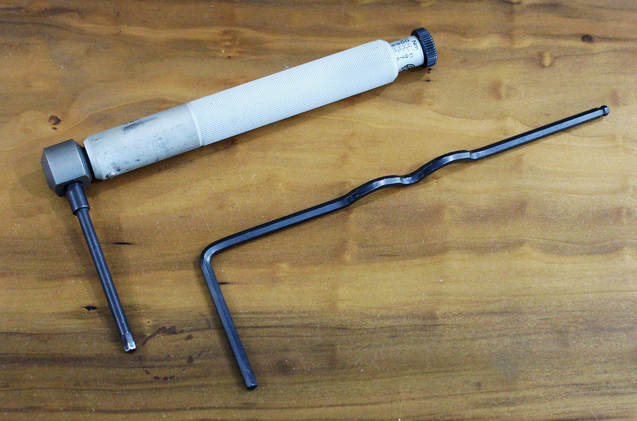
For correct tightening of the action screws, ANSCHÜTZ recommends the use of a torque wrench, starting at 2.5 Nm ( 22 inch-lbs ) and not to exceed 4.0 Nm ( 35 inch-lbs).
Excessive screw torque may cause damage.! If you have further questions contact the service center.
1727 / 1827 Fortner Bolt
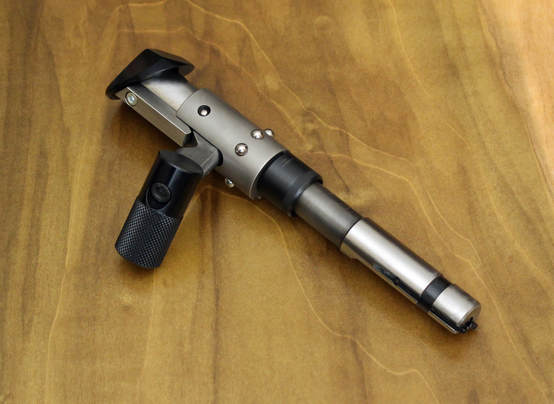
With the growing popularity of the 1727 system for sporting rifles, we are starting to receive warranty / service requests from shooters who are having problems with their rifle bolts.
The problem being reported is that after cleaning the rifle, the bolt will no longer close completely in the action.
This had puzzled us at first, but then we realized customers were taking apart their bolts to clean and not properly reassembling them.
The Fortner bolt is far more complicated than the standard 54 or 64 bolt, and it requires special attention to completely take the bolt apart for service and maintenance.
Unless there is a compelling reason to completely take apart the bolt, you should not do this. Cleaning the bolt can be as easy as wiping down the exterior of the bolt and applying a few drops of oil on the moving parts. If you intend to work further into the bolt, be sure to review your user's manual.
If you cannot get your bolt back into working order, we can reassemble and check the function, but there is a $45.00 service fee ( + shipping ) and any broken parts due to trying to use an incorrectly assembled bolt will not be covered under warranty.
Below is a video of how to replace a firing pin on the 1827. Other than the end cap, the bolts are nearly identical between the 1827 and 1727 rifles. If you need help with your bolt, please take a look at this video.
https://www.youtube.com/watch?v=dMroBlzDOho
Wood Stock Care
We have developed this section to include more up-to-date information on stock care, as well as some ideas and practices used in our Custom Shop here in the USA.
Most importantly, keep the stock dry and free from any water or condensation buildup. Also, avoid spilling any solvents or other cleaning agents on the stock. In addition, do not stick any tape or other items with adhesive on the stock - this may peel off the finish.
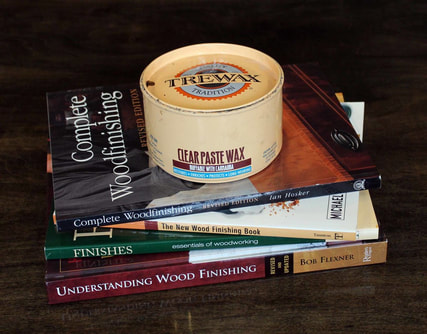
Depending on use, buffing out the wood with a high-quality wax is ideal. There are many good choices to pick from, but we have listed a few which have impressed us with their quality.
We suggest the following brands:
All three brands offer a clear, hard wax which is perfect for maintaining the stock's finish. Follow the manufacturer's instructions for application techniques, and you will achieve the results you are looking for. All stocks from the Custom Shop are buffed out with Trewax.
For further reading, our two favorite books are:
These two books contain very detailed information about the different kinds of wax and how to apply them. If you want to take wood finishing to the highest level, these two books are essential.
We have developed this section to include more up-to-date information on stock care, as well as some ideas and practices used in our Custom Shop here in the USA.
Most importantly, keep the stock dry and free from any water or condensation buildup. Also, avoid spilling any solvents or other cleaning agents on the stock. In addition, do not stick any tape or other items with adhesive on the stock - this may peel off the finish.
Depending on use, buffing out the wood with a high-quality wax is ideal. There are many good choices to pick from, but we have listed a few which have impressed us with their quality.
We suggest the following brands:
- Trewax ( Excellent all purpose wax - great for 64 stocked rifles )
- Antiquax ( Perfect for 1700 series rifles )
- Renaissance ( We use this on all GRS Stocks )
All three brands offer a clear, hard wax which is perfect for maintaining the stock's finish. Follow the manufacturer's instructions for application techniques, and you will achieve the results you are looking for. All stocks from the Custom Shop are buffed out with Trewax.
- If you have more questions on stock care, please email the Custom Shop for assistance. [email protected]
For further reading, our two favorite books are:
- Finishes & Finishing Techniques from Fine Woodworking ( Taunton Press, 1999 )
- Complete Woodfinishing by Ian Hosker ( Guild of Master Craftsman Publications Ltd., 2003 )
These two books contain very detailed information about the different kinds of wax and how to apply them. If you want to take wood finishing to the highest level, these two books are essential.

